When you don’t have a plunger to unclog your toilet, a toilet auger can be the solution. It looks short but gets almost three feet long once fully extended. Its flexible shaft can go inside the toilet’s drain within seconds, and the thick head section dislodges the obstacles.
We can control it with a handle. It lets us adjust the cable’s length after placing it in the toilet. The best thing is that it doesn’t scratch the toilet’s wall like the regular drain snakes.
Overall, using augers is easy and beneficial as well. So, without further ado, let’s jump into our step-by-step guide.
Things you have to collect
- Toilet auger
- Hand gloves
- Hot water
- Dishwashing soap, washing powder
- Old newspaper or large plastic bag
- Bucket
- Soft towel
Wear the gloves before starting your work.
Step 1: Find out the reasons behind the clog
Toilets can be clogged by toothbrushes, toilet paper, tissue paper, large paper pieces, cotton balls, toys, soaps, and even dirty water. In short, dropping or flushing every kind of non-flushable item will lead to clogging.
Sometimes, small particles keep gathering on the plumbing vents and toilet traps. They get bigger over time and restrict water flow. Another culprit is the main sewer line blockage. In that case, you should take help from professional plumbers.
Step 2: Remove the visible debris first
This step will make the unclogging process way more manageable. You can use any long spoon-like items and dump the debris in the dustbin. Then, prepare a mixture of hot water and a few drops of dishwashing soap.
Make sure not to use boiling water to prevent cranking. Pour the liquid into the toilet bowl gradually. Keep your eyes on the water level. This little effort will help to release more dirt. As you add dishwashing soap, it will reduce the smell and free the greasy lumps.
Many tutorials suggest flushing instead of pouring warm soapy water. Doing so can flood the washroom floor with stinky toilet water.
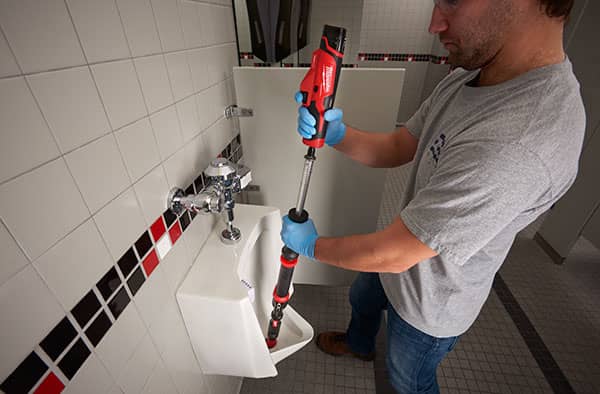
Step 3: Use your toilet auger
Put the auger’s end into the toilet bowl. Slide the shaft in. Stop when the rubber handle reaches the toilet’s crook. Now, you have to release the cable by simply cranking the snake’s handle clockwise. Apply enough force to send the cord all the way down the curves.
Toilet clogs may require more than one trial. So, be patient and slow. Hurring might result in a tangled cable.
As soon as it touches the obstacles, it won’t go forward, and you’ll feel the resistance. If the dirty water is going down, it means the clogs are already broken apart. Otherwise, you have to put more effort. Keep moving the handle in different directions. You will see the water disappear after some time.
Step 4: Retract the cable
It’s time to pull the auger out. Place the newspaper or plastic bag nearby so that you can put the dirty auger there. Rotate the handle counterclockwise. The cable will come out automatically.
Step 5: Flush your toilet
When the water depth returns to normal, press the flush button. If the water is draining normally, there is no more blockage. On the other hand, the presence of obstacles will fill up the bowl again. Therefore, you have to insert the auger again. Repeat the whole process until the clogging problem is solved.
Step 6: Clean the auger
First of all, clean the surface dirt. Put it inside the bowl while holding the handle and flush the toilet. Alternatively, pour water from a jar. Take washing powder, hot water, and disinfectant in a bucket. Mix them well and leave the auger there for five minutes.
Or, you can submerge it into a vinegar-water solution for a while. Avoid soaking for an extended period because the cleansers can damage it. Rinse off thoroughly with water. Since the auger is made of metal, it will rust in touch with moisture. Hence, dry it properly with a soft towel or newspaper.
Last but not least, store your auger in a dry place.
Leave a Reply