Many people own a large basement with plenty of spare room. Installing a toilet is the best idea to utilize the space. It also saves time because they don’t need to go upstairs just to use the bathroom. Such a construction falls in any of these two groups- rough-in and finisheses plumbing. The former includes the installation of water lines, sewers, drain pipes, etc. Today, we are going to know about the whole process in detail.
Estimate the cost
Fixing a budget is the most crucial phase of all types of construction work. High-end models usually range from $700 to $1000. You may not want to invest lots of cash in a basement toilet. In that case, go for a regular toilet that is available for under $300. The cost depends on the washroom’s size, tools, pipes, and other fixtures too. Besides, you can set it up without even calling an expert. So, you don’t have to come up with big numbers.
Determine the type of the toilet
Standard units are perfect for places with existing plumbing systems. If you are not interested in adding new pipes, go for upflush brands. They let the customers set up a washroom anywhere. Another popular choice is a sewage ejector toilet system.
It is a conventional model along with miniature septic systems. Finally, we have nature-friendly composting toilets. There is no need for water and complex installation. But users have to clean up the waste container themselves. Since your basement already covers a piping system, stick to the first category.
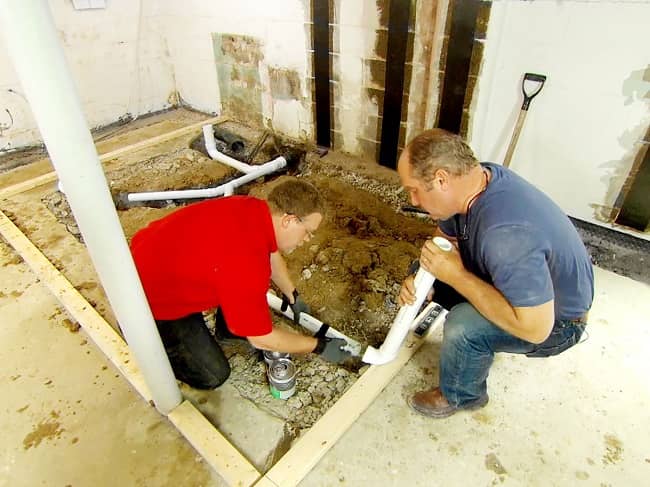
Detect the main drain placement
Start by finding out the drain’s position in the basement. It should have a high depth to permit a sufficient downhill slope in the new lines. It will help in efficient sewage disposal. Locate the 3 to 3.5 -inches wide main stack.
Measure the adequate slope
Select a perfect place to set the toilet. Clean up the place properly and decide where you have to drill the holes. Do not pick this place randomly. Drain lines can’t operate properly without a minimum of ¼-inch downhill slope.
It makes dirt removal easier through the pipes. You have to calculate two other numbers for this procedure- the depth of the main line’s center and the pipe below your drain. Subtract the second number from the first one and multiply with 4.
The result will be the maximum distance you can install a toilet from the mainline. Sometimes, the ideal location can be far away from the line. Setting up ejector sewage pumps will solve this problem. It will join the mainline to your toilet.
Mark the washroom layout
Plan out the future placements of the toilet, faucet, sink, and other fixtures. It is better to sketch the design on paper first and mark the floor accordingly. Next, figure out how everything will achieve a connection with the mainline.
Set up the toilet drain pipe
In this step, you need a jackhammer or sledgehammer. It will enable you to break the cement layer following the main line’s direction. Keep the water motor turned off. Take your pipe cutter to cut the line. As soon as you finish it, install a Y-fitting. Tighten the metal rings well; don’t leave them loose or too tight. Fill the large trench with soil and apply concrete over it. Smoothen out the edges and layers. Wait until they dry.
Place the toilet flange
After inspecting the drainpipe, drill the flange. Then, drill some holes in the floor. Wash the drainpipe and flange thoroughly. Buy adhesive that is compatible with the flange. Insert the flange such that it gets an excellent adhesive layer around it. Apply caulk to make it more stable and leakproof.
Establish a water supply mechanism
You have to trim the pipe leaving enough space to position the shut-off valve. Let a compression nut as far away as it goes. You can place the compression valve right after placing the compression ring. Use wrenches to tighten the compression nut. No leaks should be present here.
Install the toilet
First of all, set up the closet bolts and flange seal. Feel free to use wax as a seal. Tighten the closet bolts with a wrench. Attach the wax ring and wax seal to the right place. Install your toilet on top of the ring. Install the tank carefully and activate the water supply. If there is no leak, your bathroom is ready to use.
Leave a Reply